
How to Grow Sprouts at Home
Contents
- 1 A Beginner-Friendly, Safe & Science-Based Guide
- 2 Why Grow Sprouts at Home?
- 3 What Are Sprouts?
- 4 What You Need to Grow Sprouts at Home
- 5 The Basic Sprouting Process (Step-by-Step)
- 6 Different Sprouts Grow Differently
- 7 How Long Do Sprouts Take to Grow?
- 8 Common Sprouting Problems (And How to Fix Them)
- 9 Are Sprouts Safe to Eat Raw?
- 10 Nutritional Differences Between Sprouts
- 11 Frequently Asked Questions
- 12 References & Data Sources
A Beginner-Friendly, Safe & Science-Based Guide
Growing sprouts at home is one of the simplest ways to produce fresh, nutrient-dense food year-round — no soil, no garden, and very little equipment required. With just seeds, water, and basic hygiene, you can harvest edible sprouts in as little as 2–7 days.
This guide explains not only how to grow sprouts, but also why each step matters, how different sprouts behave, and how to grow them safely and consistently.
Why Grow Sprouts at Home?
Home-grown sprouts offer several advantages over store-bought options:
- Freshness: Sprouts are harvested at peak vitality, often minutes before eating.
- Higher enzyme activity: Sprouting activates enzymes and improves nutrient bioavailability.
- Cost efficiency: A small amount of seeds yields multiple harvests.
- Year-round growing: No sunlight or outdoor space required.
- Minimal waste: No packaging, refrigeration, or long transport.
Sprouts are often described as “living foods” — harvested at the earliest edible stage of plant development when vitamins are at their highest concentration.
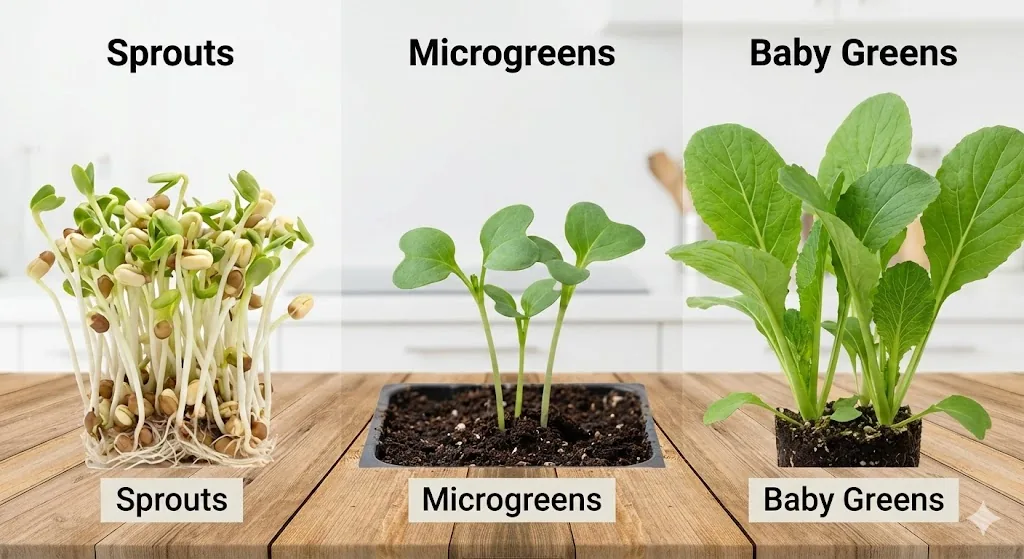
What Are Sprouts?
(Sprouts vs Microgreens vs Baby Greens)
Understanding the difference helps avoid common beginner confusion, especially regarding nutritional density.
- Sprouts & Shoots: While some eat the whole germinated seed, high-quality home harvesting often focuses on the fresh green shoots. By discarding the seed hulls (especially in Sunflower or Soy), you get a crispier, lower-calorie vegetable with a higher percentage of water and fiber.
- Microgreens: Young shoots grown in soil or substrate, harvested above the root after true leaves appear.
- Baby greens: Immature leafy vegetables grown for several weeks until they reach 3–4 inches.
Sprouts are unique because they grow primarily without soil, and for many varieties, the most nutritious part is the rapidly expanding shoot.
What You Need to Grow Sprouts at Home
Basic Equipment
You only need one of the following:
- Glass jar with a breathable mesh lid.
- Sprouting tray with fine drainage holes.
- Sprouting bag (ideal for smaller seeds).
Good airflow and complete drainage are more important than the container itself to prevent bacterial growth.
Choosing the Right Seeds (Critical)
Always use edible-grade sprouting seeds. Avoid:
- Seeds treated for planting (often coated in fungicides).
- Chemically coated or dyed seeds.
- Animal feed or bulk grain seeds.
Look for:
- “Sprouting” or “Food-grade” labeling.
- Reputable seed suppliers.
- Organic seeds when possible to ensure a chemical-free harvest.
The Basic Sprouting Process (Step-by-Step)
All sprouts follow the same core biological process, but the transition from a “starchy seed” to a “fresh shoot” depends on these steps.
Step 1: Rinsing
Rinse seeds thoroughly with clean water to remove dust and debris. This reduces the initial microbial load before soaking begins.
Step 2: Soaking
Soak seeds in clean, filtered water.
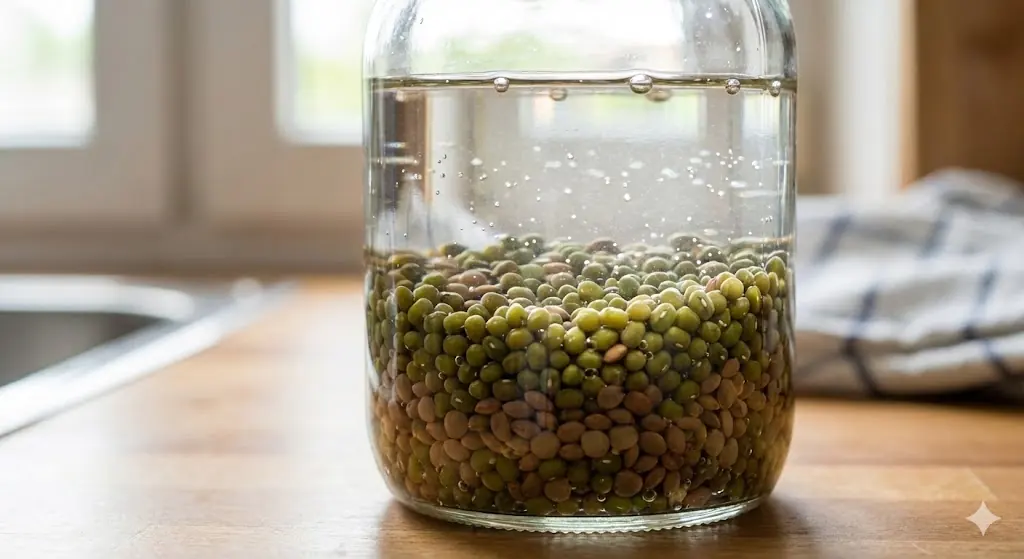
- Small seeds: 4–6 hours.
- Medium seeds: 6–8 hours.
- Large legumes: 8–12 hours.
What soaking does: It rehydrates the seed, neutralizes anti-nutrients (like phytic acid), and signals the plant to begin its life cycle.
Step 3: Draining
Drain all soaking water completely. Standing water is the #1 cause of sprout failure. Seeds should remain moist but never submerged.
Step 4: Daily Rinsing
Rinse and drain sprouts 2–3 times per day.
- Maintain airflow.
- Keep them in a cool, dark place for the first few days.
- Pro Tip: For Broccoli or Sunflower sprouts, expose them to indirect light on the final day to activate chlorophyll and boost Vitamin C levels.
Step 5: Harvesting
Sprouts are ready when they reach their typical edible length. For varieties like Lentil, Sunflower, or Soybean, many growers choose to remove the seed hulls at this stage. This results in a “Shoot-Only” harvest which is much lighter, crisper, and lower in calories.
Different Sprouts Grow Differently
Not all sprouts behave the same. Grouping them helps beginners succeed.
Easy Sprouts for Beginners
- Alfalfa, Broccoli, Radish.
- Traits: Fast germination, low failure rate, and high Vitamin C density.
Protein-Rich Legume Sprouts
- Lentil, Chickpea, Mung bean.
- Traits: High protein density. Note that as the shoot grows longer, the starch in the seed is consumed, making the sprout easier to digest.
Strong-Flavor or Advanced Sprouts
- Fenugreek, Mustard, Sunflower.
- Traits: Sunflower shoots are best harvested when the seed hull falls off; they offer a unique nutty flavor and excellent fiber.
How Long Do Sprouts Take to Grow?
- Fast sprouts: 2–4 days (e.g., Radish, Mung Bean).
- Average sprouts: 4–6 days (e.g., Alfalfa, Broccoli).
- Large seeds/Shoots: up to 7 days (e.g., Sunflower).
Note: Longer growth changes the nutritional profile. While calorie density decreases as the seed is “used up,” the concentration of enzymes and micro-minerals typically increases.
Common Sprouting Problems (And How to Fix Them)
Slimy Sprouts
- Cause: Poor drainage or high humidity.
- Fix: Increase rinsing frequency but ensure the container is angled for 100% drainage.
Bad Smell
- Cause: Bacterial growth.
- Fix: If it smells “off” or like ammonia, discard the batch and sanitize everything with vinegar or a mild bleach solution.
White Fuzz
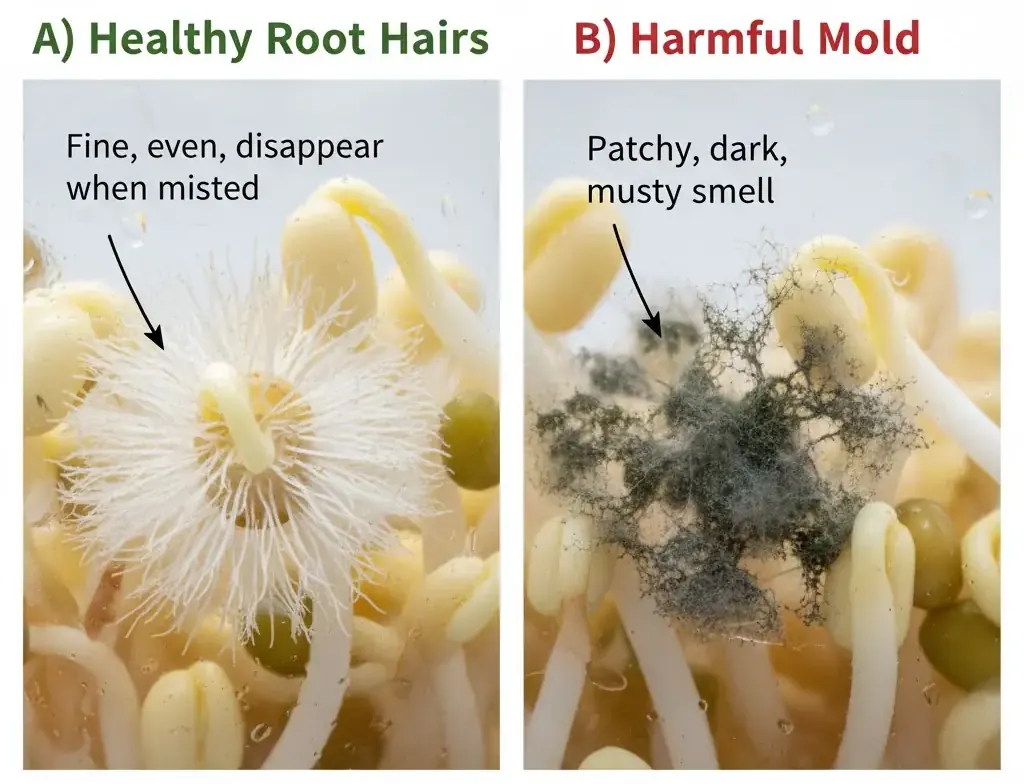
- Note: Don’t panic! These are often root hairs, not mold. Root hairs disappear when wet; mold remains visible and usually smells musty.
Are Sprouts Safe to Eat Raw?
Sprouts are generally safe when grown with hygiene in mind.
- Large Legumes (Soybean, Chickpea): It is highly recommended to blanch or lightly cook these, even if you are only eating the shoots, to neutralize heat-sensitive anti-nutrients.
- Leafy Sprouts: Alfalfa and Broccoli are excellent raw.
- Vulnerable Groups: People with weakened immune systems should always cook sprouts before consumption.
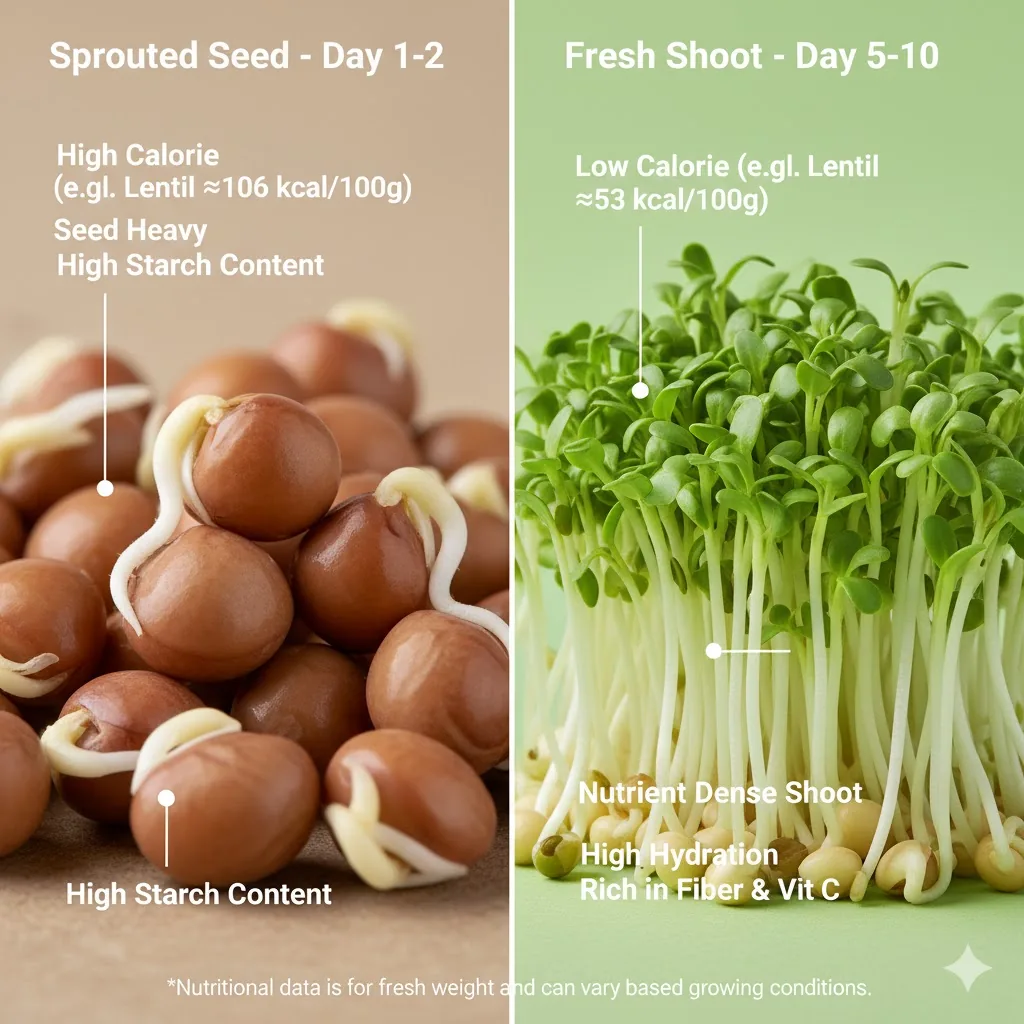
Nutritional Differences Between Sprouts
Sprout nutrition varies significantly based on whether you are measuring the entire seed or just the fresh shoot.
- Seed-on data: Higher in calories, starch, and fats.
- Shoot-only data: Higher in hydration, fiber, and Vitamin C.
To get the most accurate picture of your homegrown harvest, you must use data that reflects the fresh-weight of the shoots.
👉 You can explore side-by-side nutrition (including shoot-specific protein and fiber) using our [Sprout Nutrition Comparison Tool].
Frequently Asked Questions
Do sprouts need sunlight?
No. They grow using stored energy from the seed. However, a little indirect light on the final day helps develop green chlorophyll.
How long do sprouts last after harvest?
3–5 days in the refrigerator. Ensure they are dry before storing to maintain crispness.
Why does my lentil/soybean sprout have fewer calories than the label says?
The label often refers to the dry seed. Once it grows into a fresh shoot and the seed part is minimized or discarded, the water content increases, naturally lowering the calorie density per 100g.
References & Data Sources
Medical News Today
What are sprouts? Benefits and nutrition
https://www.medicalnewstoday.com/articles/319377
University of Minnesota Extension
Growing sprouts at home safely
https://extension.umn.edu/food-safety/growing-sprouts-home
University of California Agriculture and Natural Resources (UC ANR)
Sprouting seeds at home
https://ucanr.edu/sites/gardenweb/Sprouting_Seeds/
U.S. Food & Drug Administration (FDA)
Sprouts: What You Should Know
https://www.fda.gov/food/buy-store-serve-safe-food/sprouts-what-you-should-know
Healthline
Mustard Sprouts: Nutrition, Benefits, and How to Grow Them
https://www.healthline.com/nutrition/mustard-sprouts