How to Sprout an Avocado Seed
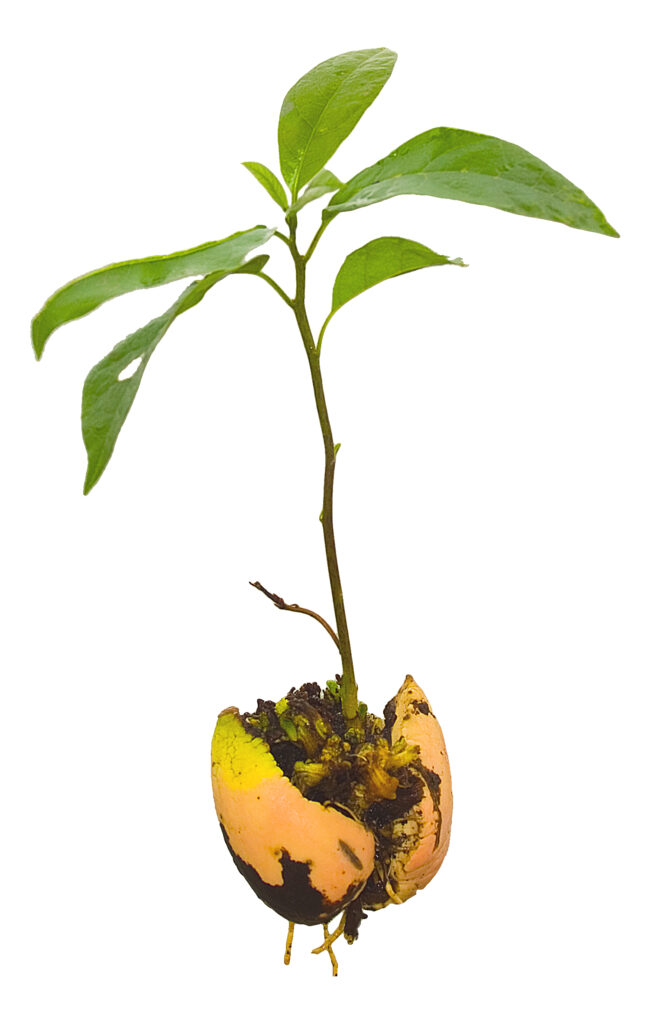
One minute it is sitting on the cutting board beside toast, guacamole, or a salad. The next, with a glass of water and a few toothpicks, it becomes a small experiment in patience. For several days nothing seems to happen. Then the brown coat loosens, the pit splits, and a pale root begins to reach downward before the green shoot ever appears.
Sprouting an avocado seed is not the fastest gardening project, but it is one of the most satisfying. It costs almost nothing, it works indoors, and it lets you watch the whole beginning of a tree through clear glass.
This guide explains the classic water method, the soil method, what timeline to expect, when to give up and start another seed, and how to care for the young avocado plant after it sprouts.
Contents
- 1 Quick Answer
- 2 What You Need
- 3 Step 1: Remove and Clean the Seed
- 4 Step 2: Find the Top and Bottom
- 5 Step 3: Add Toothpicks and Suspend the Seed
- 6 Step 4: Place It Somewhere Bright and Warm
- 7 Avocado Seed Sprouting Timeline
- 8 Step 5: Wait for Roots Before Planting
- 9 Step 6: Move the Sprouted Seed to Soil
- 10 Soil Method: Can You Skip the Glass?
- 11 Water Method vs. Soil Method
- 12 Aftercare: How to Keep the Avocado Seedling Healthy
- 13 Will an Avocado Seed Grow Fruit?
- 14 Troubleshooting
- 15 Common Mistakes to Avoid
- 16 Frequently Asked Questions
- 17 Final Thoughts
- 18 Data Sources
Quick Answer
To sprout an avocado seed, rinse a fresh pit, identify the broad flat bottom and the slightly pointed top, suspend the seed over a glass with 3-4 toothpicks, and keep the bottom one-quarter to one-half of the seed in water. Place it in bright indirect light, refresh the water every few days, and wait.
Most viable avocado seeds begin to crack and root within a few weeks, but slow seeds can take 6-8 weeks. If there is no root or crack after about 2 months, it is usually best to start again with a fresh seed.
What You Need
You do not need a grow light, a heat mat, or a complicated setup.
Basic supplies:
- 1 fresh avocado seed from a ripe avocado
- 3-4 wooden toothpicks
- A clear glass or jar
- Clean water
- A bright windowsill or bright indirect light
- A small pot with drainage holes
- Well-draining houseplant potting mix
Optional but helpful:
- A spoon for removing the seed without cutting it
- A soft cloth or paper towel
- A spray bottle
- A plant label with the start date
Step 1: Remove and Clean the Seed
Cut the avocado carefully and lift the pit out with a spoon. Try not to gouge the seed with a knife. A deep cut can damage the living tissue inside and reduce the chance of sprouting.
Rinse the seed under water and rub away any green flesh. If avocado flesh is stuck to the seed, soak it for 5-10 minutes and wipe again. A clean seed is less likely to develop mold in the first week.
You can leave the thin brown seed coat on. It may peel or flake away later as the seed swells and splits. If it loosens naturally, that is fine. Avoid aggressively scraping the seed, because the goal is to clean it, not injure it.
Step 2: Find the Top and Bottom
This small detail matters.
The bottom of an avocado seed is usually broader, flatter, and sometimes slightly concave. Roots grow from this end. The top is usually a little more pointed. The shoot grows upward from there.
Place the seed with the pointed end up and the broad flat end down.
If you suspend the seed upside down, it may fail or take much longer.
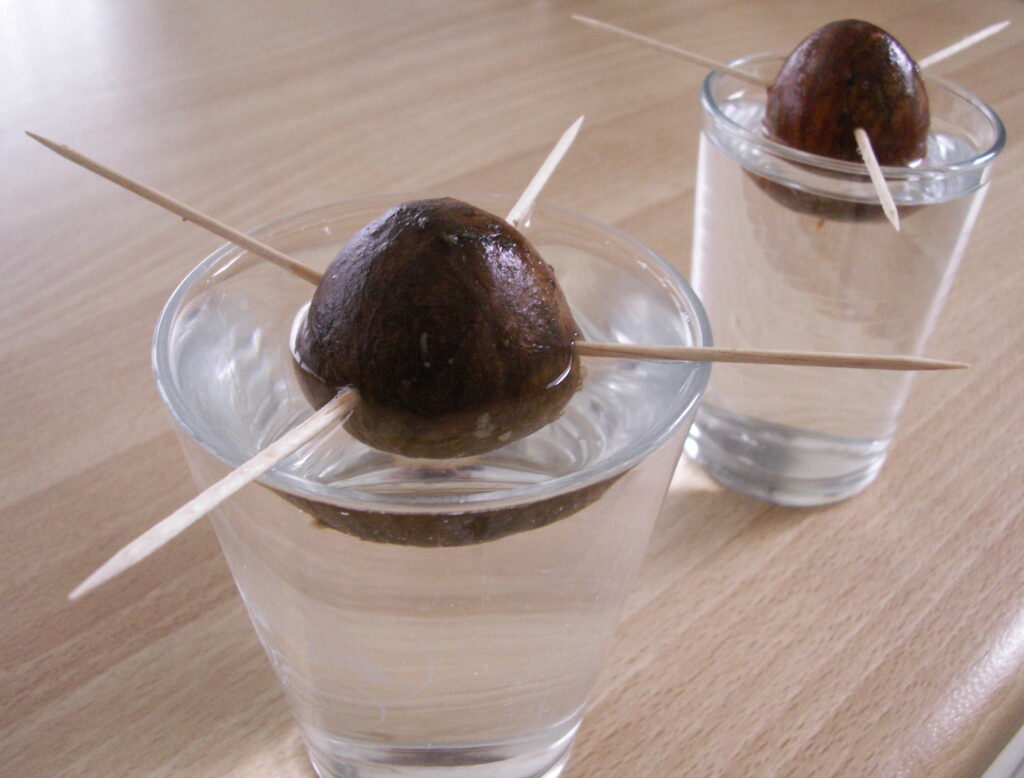
Step 3: Add Toothpicks and Suspend the Seed
Push 3-4 toothpicks into the sides of the seed, about halfway up. Angle them slightly downward so the seed can rest securely on the rim of the glass.
Fill the glass with water until the lower part of the seed is submerged. Different guides recommend slightly different water levels, but the most reliable range is simple:
- Keep at least the bottom one-quarter wet.
- Submerging the bottom half is also fine.
- Keep the pointed top above water.
The seed should sit steadily, with the bottom always touching water.
Step 4: Place It Somewhere Bright and Warm
Put the glass in bright indirect light, such as near a sunny window but not in harsh, all-day direct sun.
Avocados are tropical plants, so warmth helps. A normal indoor room is usually enough. If the glass sits in a cold draft, germination may slow down.
Change the water every 2-5 days, or sooner if it becomes cloudy. Top it up whenever the level drops, because a new root can dry out quickly once it appears.
Avocado Seed Sprouting Timeline
Every seed has its own pace. Some crack quickly; others sit quietly for weeks and then suddenly wake up.
| Stage | What You May See | Typical Timing |
|---|---|---|
| Seed swells | Brown coat may loosen or wrinkle | Week 1-3 |
| Pit cracks | A vertical split opens | Week 2-6 |
| Root emerges | A pale taproot grows downward | Week 3-8 |
| Shoot appears | Green stem grows from the top | Week 4-10 |
| Ready for soil | Roots are 2-3+ inches long, shoot has leaves | Often 6-12 weeks |
If nothing has happened after 8 weeks, the seed may not be viable. You can keep waiting if you are curious, but for practical growing, start a second seed.
Step 5: Wait for Roots Before Planting
The root usually appears before the shoot. That is normal.
Let the root grow until it is at least 2-3 inches long and looks healthy. Some growers wait until the root system is fuller or the stem has reached several inches tall. Both approaches can work.
The important thing is not to plant too early. A cracked seed with no real root is still vulnerable. Give it enough time to anchor itself.
Step 6: Move the Sprouted Seed to Soil
Choose a pot with drainage holes. A pot around 8-10 inches wide gives the young plant room without holding too much wet soil.
Fill the pot with well-draining potting mix. Make a hole deep enough for the root so it does not bend sharply or bunch at the surface.
Plant the seed with:
- Roots pointing down
- Shoot pointing up
- Bottom half of the seed buried
- Top half still visible above the soil
Water thoroughly until water drains from the bottom. Then place the pot in bright indirect light.
Soil Method: Can You Skip the Glass?
Yes. Avocado seeds can be started directly in soil.
To use the soil method, fill a pot with moist, porous potting mix. Plant the seed with the broad end down and the pointed end about 1 inch above the soil surface. Keep the soil moist but not soggy.
The soil method is less dramatic because you cannot watch the root grow, but it has one advantage: the seed does not need to adjust from water roots to soil. Nebraska Extension notes that both water and soil methods work, and that soil may produce faster results.
For most beginners, the water method is still more encouraging because you can see what is happening. For gardeners who tend to forget water changes, soil may be simpler.
Water Method vs. Soil Method
| Method | Best For | Main Advantage | Main Risk |
|---|---|---|---|
| Water + toothpicks | Beginners, kids, visual learners | You can watch roots develop | Cloudy water, mold, root damage during transplant |
| Soil | Practical growers | Less transplant shock | Harder to see progress; overwatering risk |
| Damp paper towel/bag | Experimenters | Space-saving, often quick | Mold if too wet or forgotten |
If this is your first avocado seed, start with the water method. If you are sprouting several seeds, try one in water and one in soil and compare them.
Aftercare: How to Keep the Avocado Seedling Healthy
Once the avocado is in soil, the main job changes from sprouting to steady care.
Light
Give the plant bright light. Indoors, place it near your sunniest window but slightly to the side if direct afternoon sun is too strong.
If the stem becomes long, thin, and floppy, it likely needs more light.
Water
Water when the top layer of soil begins to dry. Avocado roots like moisture, but they do not like sitting in wet soil.
A simple test: push your finger into the soil. If it feels dry at root depth, water slowly until excess drains from the bottom.
Yellowing leaves can mean too much water. Crispy brown edges can mean the plant dried out, sat in direct heat, or experienced salt buildup from water or fertilizer.
Pruning
Many avocado seedlings grow straight upward at first. To encourage a fuller plant, pinch or prune the top once the stem is about 6-12 inches tall and has healthy leaves.
Cut just above a leaf node. New side growth should form below the cut.
Fertilizer
Wait until the seedling is established in soil before fertilizing. Then use a diluted balanced houseplant fertilizer during active growth. More is not better; young roots are easy to stress.
Will an Avocado Seed Grow Fruit?
Maybe, but it is not the reason to start one.
An avocado grown from seed is genetically different from the fruit it came from. It may never fruit indoors, and even outdoors in a warm climate, fruit quality is unpredictable. Grafted nursery trees are used when reliable fruit production matters.
Several gardening sources give long timelines for seed-grown trees. Food Network cites 5-13 years to bear fruit, while Tom’s Guide notes fruiting may take more than 7 years. AP News also emphasizes that seed-grown indoor plants are more realistic as houseplants than fruit trees.
So think of this project as growing a living keepsake, not a guaranteed avocado harvest.
Troubleshooting
The seed is moldy
Wipe the seed gently, rinse the glass, and change the water more often. A little surface film is common. Soft, foul-smelling rot is a sign to start over.
The water turns cloudy
Refresh the water every 2-5 days. Use a clean glass. Remove any avocado flesh that was left on the pit.
The seed cracked but no root appeared
Wait. Cracking is usually the first visible sign. Roots may follow days or weeks later.
The root appeared but no shoot grew
This can happen. Keep the root submerged and give the seed bright indirect light. The shoot often appears later.
The leaves are yellow
The plant may be overwatered. Let the top of the soil dry before watering again and confirm that the pot drains freely.
The leaves are dry and falling
The plant may be underwatered, exposed to too much direct heat, or adjusting after transplanting. Water deeply, improve humidity if the indoor air is very dry, and keep the plant in bright but gentle light.
Common Mistakes to Avoid
- Starting with an old, dried-out seed
- Cutting into the pit when removing it
- Placing the pointed end down
- Letting the water level drop below the root
- Keeping the glass in a cold or dark spot
- Planting before roots are developed
- Using a pot without drainage
- Keeping the soil constantly wet
- Expecting indoor fruit from a seed-grown plant
Frequently Asked Questions
How long does it take to sprout an avocado seed?
Most seeds show cracking or roots within a few weeks, but many take 6-8 weeks. If there is no sign of life after about 2 months, start a new seed.
Which end of the avocado seed goes in water?
The broad, flatter end goes down into the water. The pointed end stays up.
How much of the seed should be underwater?
Keep the bottom one-quarter to one-half of the seed in water. The top should stay exposed to air.
Do I need to peel the brown skin off?
No. The seed can sprout with the brown skin on. If the skin loosens naturally, you can remove the loose pieces. Do not scrape deeply into the seed.
Can I plant an avocado seed directly in soil?
Yes. Plant it broad end down, with the pointed end about 1 inch above the soil surface. Keep the soil moist, not waterlogged.
When should I move my avocado seed to a pot?
Move it when the root system is developed, at least 2-3 inches long, and preferably when a shoot or leaves have started growing.
Is an avocado seedling safe to eat as a sprout?
No. This guide is for growing an avocado seed into a houseplant. Avocado seedlings are not grown or eaten like edible sprouts such as mung bean, lentil, or alfalfa sprouts.
Final Thoughts
Sprouting an avocado seed asks for very little: a clean pit, a glass of water, a bright place, and enough patience to let the quiet work happen out of sight.
Not every seed will grow. That is part of the lesson. But when one does, it feels personal. You remember the day you balanced it over the glass. You remember the first split, the first root, the first leaf. And suddenly the thing that almost went into the compost has become a small tree on your windowsill.
If you are new to growing plants, this is a gentle place to begin.
Data Sources
- Iowa State University Extension and Outreach, “How do you sprout an avocado seed?” https://yardandgarden.extension.iastate.edu/faq/how-do-you-sprout-avocado-seed
- Nebraska Extension in Lancaster County, “Start an Avocado From Seed” https://lancaster.unl.edu/start-avocado-seed/
- AP News, Jessica Damiano, “Want to grow an avocado tree from seed? Here’s how” https://apnews.com/article/growing-avocado-indoors-toothpicks-09ecad99e6ec58b0b7d1e53a71444280
- Food Network, “How to Grow an Avocado from Seed” https://www.foodnetwork.com/how-to/packages/food-network-essentials/how-to-grow-avocado-from-seed
- HGTV, “How to Plant an Avocado Seed and Grow Your Own Tree” https://www.hgtv.com/gardening/edible-gardening/how-to-grow-an-avocado-tree-guac-n-roll
- Tom’s Guide, “How to grow avocado from seed to get your own avocado tree” https://www.tomsguide.com/how-to/how-to-grow-avocado-from-seed
- Wikimedia Commons image: “GrowingAvocadoFromSeed.JPG” by KVDP, public domain https://commons.wikimedia.org/wiki/File:GrowingAvocadoFromSeed.JPG
- Wikimedia Commons image: “Avocado Seedling.jpg” by Mark Hofstetter https://commons.wikimedia.org/wiki/File:Avocado_Seedling.jpg